HIPAA stands for the Health Insurance Portability and Accountability Act of 1996. This is a piece of U.S. legislation that provides data privacy and security regulations to ensure sensitive medical information is protected. The law has gained greater prominence in recent years with the proliferation of health data breaches caused by cyberattacks and ransomware attacks on both health insurers and providers. Exchange Online Protection (EOP) will help you configure out of the box rules to enable your clients to be HIPAA compliant. The same is done using data loss prevention (DLP) policies.
Would you like to try Office Protect for free? Learn more in our Ultimate Guide to Office365 Security in 2018
What do DLP policies do?
- Identify sensitive information across many locations, such as Exchange Online, SharePoint Online, and OneDrive for Business.
- Prevent the accidental sharing of sensitive information.
- Monitor and protect sensitive information in the desktop versions of Excel 2016, PowerPoint 2016, and Word 2016.
- Help users learn how to stay compliant without interrupting their workflows.
How DLP policies work
DLP detects sensitive information by using deep content analysis (not just a simple text scan). This deep content analysis uses keyword matches, dictionary matches, the evaluation of regular expressions, internal functions, and other methods to detect content that matches your DLP policies. Potentially, only a small percentage of your data is considered sensitive. A DLP policy can identify, monitor, and automatically protect just that data without impeding or affecting people who work with the rest of your content.
DLP policies are synced
After you create a DLP policy in the Office 365 Security & Compliance Center, it’s stored in a central policy store and then synced to the various content sources, including:
- Exchange Online, and from there to Outlook on the web and Outlook 2013 and later
- OneDrive for Business sites
- SharePoint Online sites
- Office 2016 desktop programs (Excel 2016, PowerPoint 2016, and Word 2016)
After the DLP policy’s synced to the right locations, it starts to evaluate content and enforce actions.
DLP policy evaluation in OneDrive for Business and SharePoint Online sites
Across all your SharePoint Online and OneDrive for Business sites, documents are constantly changing—they’re continually being created, edited, shared, and so on. This means documents can conflict or become non-compliant with a DLP policy at any time. For example, a person can upload a document that contains no sensitive information to their team site, but later, a different person can edit the same document and add sensitive information to it.
For this reason, DLP policies check documents for policy matches frequently in the background. You can think of this as asynchronous policy evaluation.
Here’s how it works. As people add or change documents in their sites, the search engine scans the content and indexes it so you can find it later. While this is happening, the content is also scanned for sensitive information and to check if it’s shared. Any sensitive information that’s found is stored securely in the search index so that only the compliance team can access it, not typical users. Each DLP policy that you’ve enabled runs in the background (asynchronously), searching frequently for any content that matches a policy and applying actions to protect it from inadvertent leaks.
Finally, while documents can conflict with a DLP policy, they can also become compliant with a DLP policy. For example, if a person adds credit card numbers to a document, it might cause a DLP policy to block access to the document automatically. But if the person later removes the sensitive information, the action (in this case, blocking) is automatically undone the next time the document is evaluated against the policy.
DLP policy evaluation in Exchange Online, Outlook 2013 and later, and Outlook on the web
When you create a DLP policy, that includes Exchange Online as a location, the policies synced from the Office 365 Security & Compliance Center to Exchange Online, and then from Exchange Online to Outlook on the web and Outlook 2013 and later.
When a message is being composed in Outlook, the user can see policy tips as the content being created is evaluated against DLP policies. And after a message is sent, it’s evaluated against DLP policies as a normal part of mail flow, along with Exchange transport rules and DLP policies created in the Exchange Admin Center. DLP policies scan both the message and any attachments.
How to create a DLP policy in Exchange Online
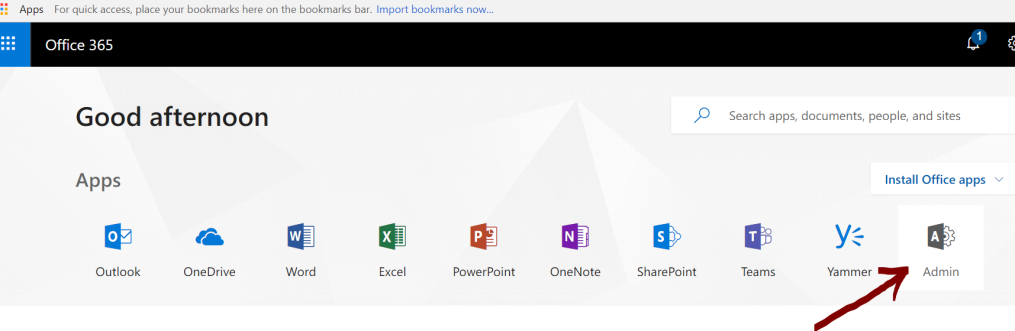
- Log in to portal.office.com using your global admin credentials.
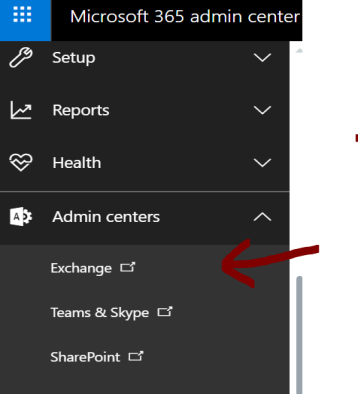
- Go to Admin centers >> Exchange.
- Click on compliance management under the left-hand navigation.
- Then, click on the data loss prevention tab at the top of the page.
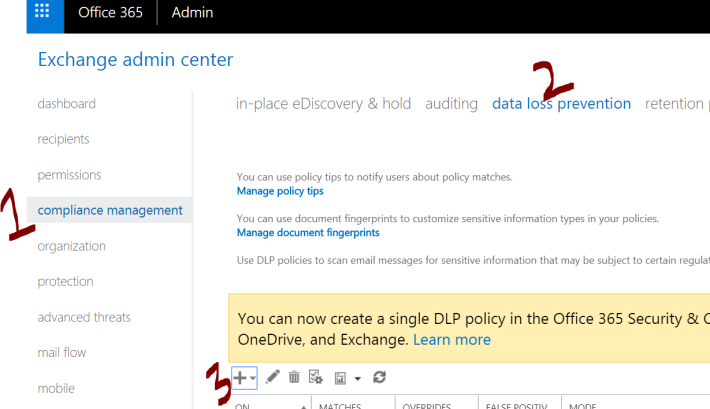
- Click on the + button to add a new DLP policy. Note: If you want to create a DLP policy from an existing template, then choose the first option in the dropdown (New DLP policy from Template).
- This takes you to the following screen.
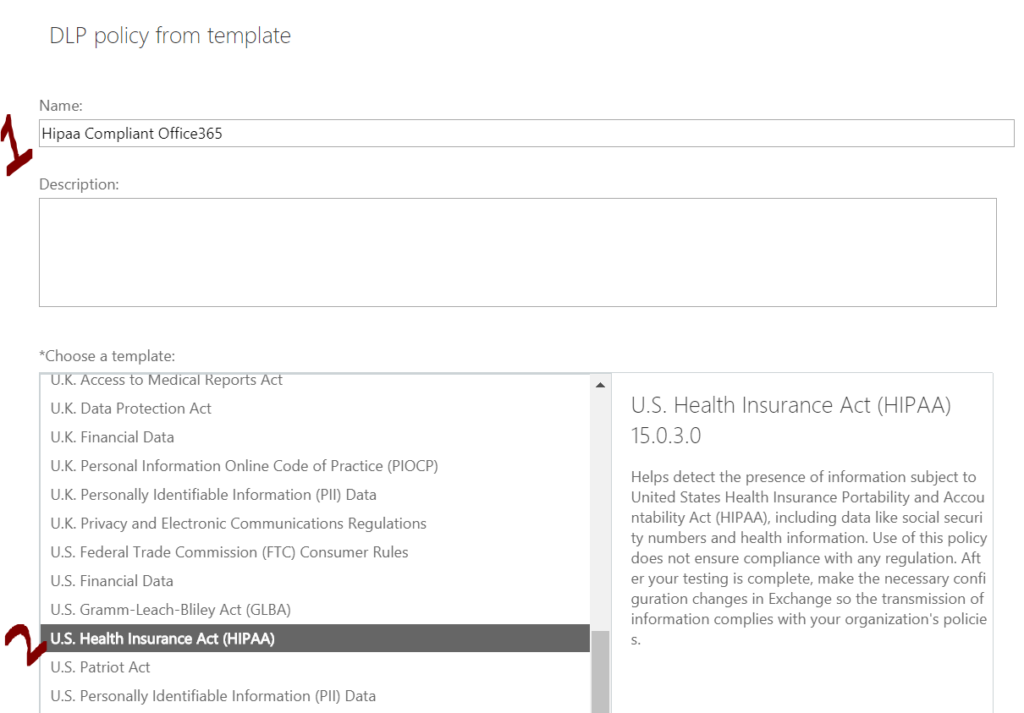
- Name your policy, and choose US Health Insurance Act (HIPAA) under the template list.
- Click on Save when you’re finished.
Alternatively, you can also have your own customized DLP policies. To do so, follow these steps:
- Click on the same + Button under the data loss prevention tab, but this time, click on New Custom Policy.
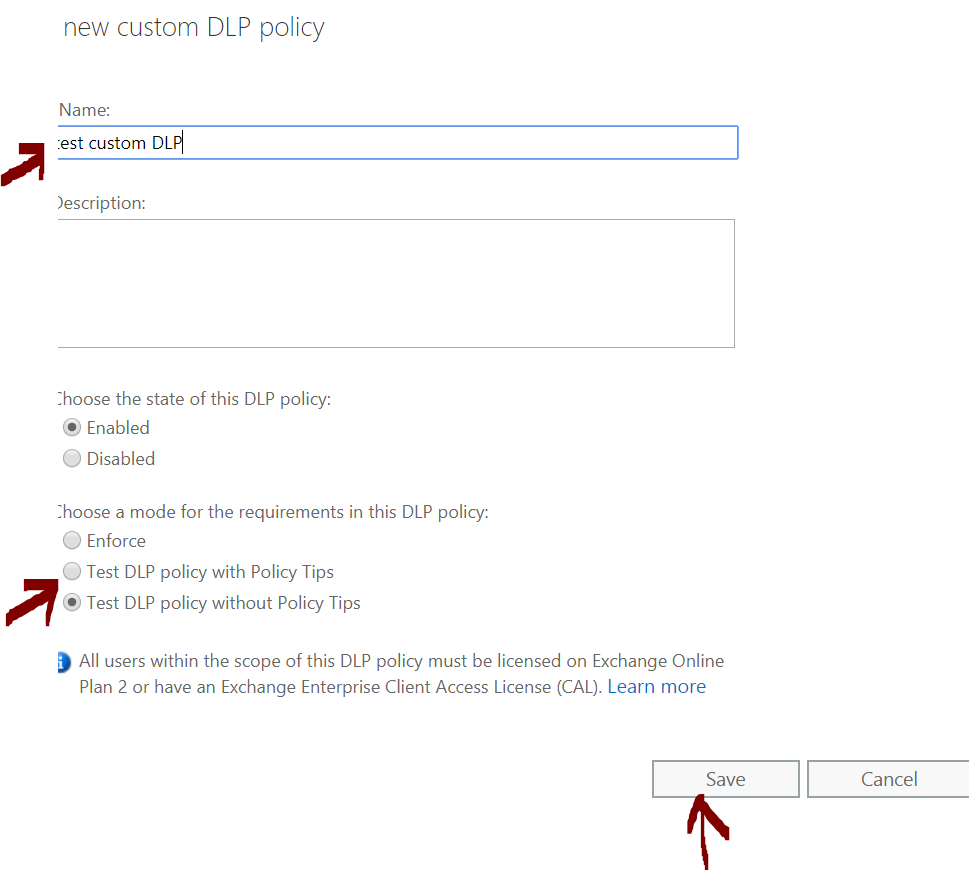
- Create the policy as per your company’s requirements, and click on Save.
- Double click on the policy you created, and go to rules in the left-hand navigation under general.
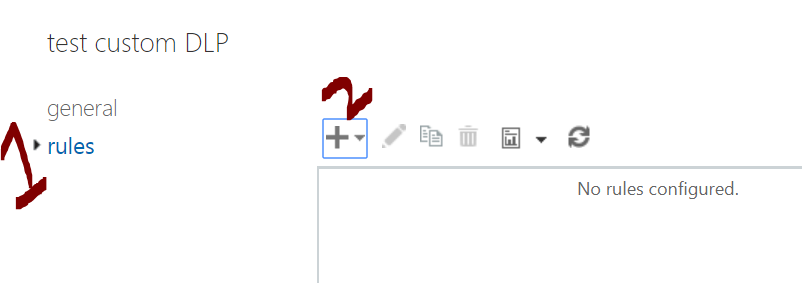
- Set the rule as per your requirements, and click on Save.
- Click on Save again. Your custom policy has been created.
Have any question on DLP policies? Get in touch!