Over the last 5 years, Microsoft’s focus has shifted towards increasing productivity for end users. PowerApps, a platform that enables a non-technical business expert to develop custom solutions, is one result of this strategy.
Microsoft launched PowerApps in 2015 and gradually added SharePoint integration capabilities – one of the most popular being the SharePoint list integration with PowerApps, which allows users to display all SharePoint data integrated within their apps.
PowerApps allows you to can manage organizational data by using either an app that you created or one created by someone else who shared it with you. Apps run on mobile devices, or you can run them in a browser.
With PowerApps, you can create an infinite variety of apps – all without having to learn a programming language.
How to set up PowerApps with SharePoint
PowerApps use either SharePoint Online or On-Premises SharePoint to automatically generate an app or build one from scratch.
First, you have to sign up for PowerApps. Microsoft recently started offering PowerApps with Office 365 and other products so you will need to check if PowerApps is already part of your package. But not, sign up for PowerApps.
Here’s how to set up PowerApps:
- Sign in to powerapps.com using the same credentials that you used to sign up.
- In the left navigation bar, click on Manage, and then click on Connections.
- Near the upper-right corner, click on New Connection.
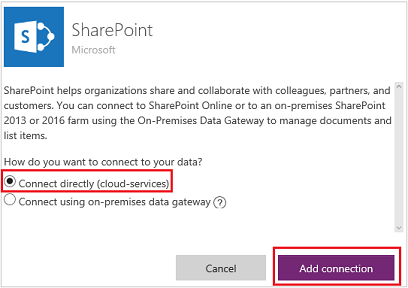
There are two types of integration, namely on the cloud and On-Premises. Here’s how each of them works.
SharePoint Online site integration
Click on Connect directly (cloud services), and then click on Add connection.
On-premises SharePoint integration
- Click on Connect using on-premises data gateway.
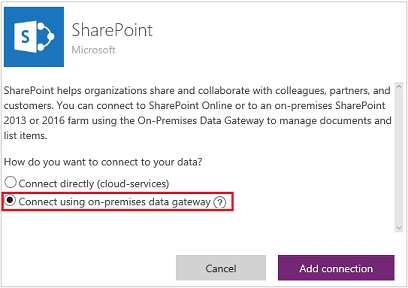 Note: Gateways and on-premises connections can only be created and used in the user’s default environment.
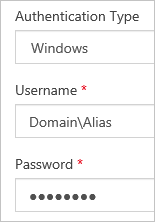
 - Specify your user name and password. (If your credentials include a domain name, specify it as Domain/Alias.)
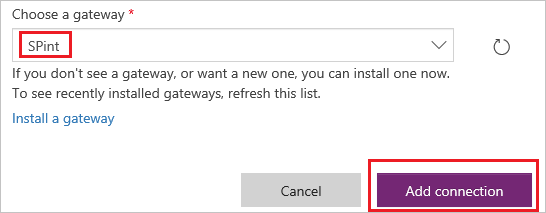
- If you don’t have an on-premises data gateway installed, install one, and then click on the icon to refresh the list of gateways.
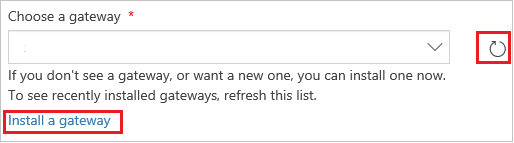
- Under Choose a gateway, click or tap the gateway that you want to use, and then click or tap Add connection.
How to use PowerApps
Once you’ve established a connection, you can easily and automatically build a new app from the SharePoint list, generate a new one from scratch or update an existing app. Or you can update an existing app and add a connection to SharePoint.
Create an app on cloud
As mentioned above, the generated app will have three screens, a screen for viewing all records, a screen for showing details of individual records, and a screen for creating or updating records.
The best layout will be automatically generated and content will also be displayed automatically. However, if they want to, the users can customize them.
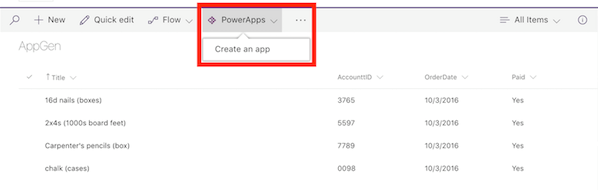
The PowerApps can be created from the command bar of any SharePoint Online custom list. Apps generated through this flow show up as views within the new SharePoint modern list experience. This allows you to leverage PowerApps to build custom, mobile-optimized views of your existing lists and share them with your co-workers.
- Open a custom list in SharePoint Online, select PowerApps on the command bar, and then select Create an app.
- In the panel that appears, enter your app name, and then select Create.
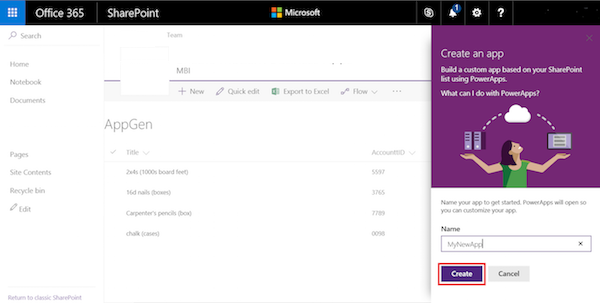 PowerApps Studio opens a new browser tab and automatically creates a default app based on the list’s schema and data.
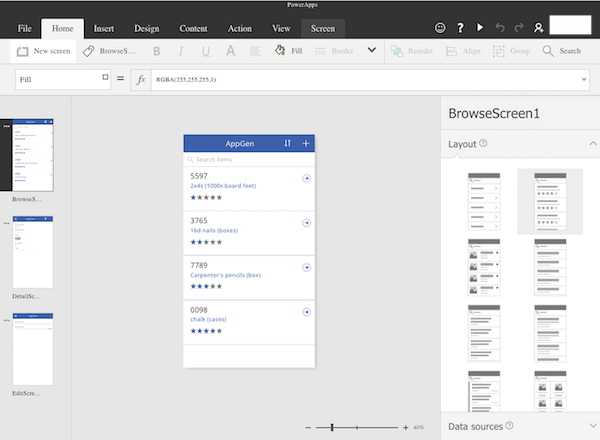
- Select Open from the original SharePoint tab. (You might need to refresh the browser window to enable the app to open.)
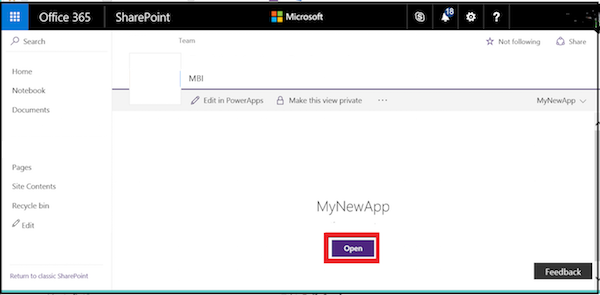 The app opens in a separate browser tab.
Create an app on-premises
Once SharePoint List and connection is configured, the following steps can be followed to create an application:
- Sign in to PowerApps Studio and create a new app.
- Under Start with your data, click on Phone layout on the SharePoint tile.
- Under Connect to a SharePoint site, type or paste the URL to the site that contains the list that you want to use, and then click on Go.

- Under Choose a list, click on the name of the list that you want to use.
- Click on Connect to generate the app.
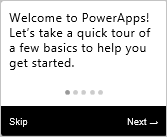
- If you’re prompted to take the intro tour, click on Next to get familiar with key areas of the PowerApps interface (or click on Skip).
Once the application is created, you can start customizing design and layouts of all screens to suit your designs.
Manage the app
![]()
If you click on Edit in PowerApps, the app opens in a separate browser tab so that you can update the app in PowerApps Studio for the web.
If you click on Make this view public, other people in your organization will also be able to see it. By default, only you can see views that you create. If you want other people to be able to edit this app, you need to share it with them and grant Contributor permissions.
If you click on Remove this view, you’ll remove the view from SharePoint. However, the app will stay in PowerApps unless you delete it.
SharePoint integration limitations
Since PowerApps is a new platform and SharePoint integration is a relatively new feature, there are few issues or limitations. Microsoft regularly provides updates for PowerApps and, hopefully, most of these problems will be resolved in the near future.
Here is a list of the outstanding issues or limitations.
- PowerApps-SharePoint integration does not support all types of columns from SharePoint lists.
- It will only support single value for Choice column
- It will only support single value for Lookup column
- It doesn’t support External Data, Rating, and Task Outcome columns
- For any columns with multiple values options, ensure that the “Allow multiple values” checkbox is not checked as PowerApps does not support multiple values.
- Currently, PowerApps can only retrieve data from custom lists. It cannot use libraries on any other data stored in SharePoint.
A tool for digital transformation
PowerApps is a powerful service that runs across platforms. Hence, you can run the apps across all devices including iOS, Android, and your web browser.
More importantly, developing PowerApps does not require any software development skills. PowerApps displays SharePoint List data in an interactive form from mobile devices.
PowerApps is still in its baby shoes and many more improvements will have to be done for other mobile devices, especially Android. But it has already generated lot of excitements and it will soon be very popular.