You’ve probably heard all about Sherweb’s new ConnectWise integration and how it will make it easier for you to automate your services and bill your customers right from our partner portal.
We’ve told you how you can use this automated billing platform to manage your products and organizations, reduce billing errors and spend more time focusing on your business.
Are you ready to start using ConnectWise? While a lot of resellers are sold on this billing platform, they’re not quite sure how to set it up. Sherweb held a webinar recently to answer resellers’ questions about PSA (Professional Services Automation) integrations. Tania Gobeil, one of the webinar presenters, said solutions like ConnectWise will really help resellers be more productive.
“It’s not necessarily just the time that you’re going to be saving. It’s the efficiency that you’re gaining. While you’re not reconciling, billing and pouring over Sherweb’s invoice to make sure that all your customers’ invoices are accurate, you can be working on your business.”
Want to set up ConnectWise in your organization? It takes only minutes to map your entire invoicing and billing system in Sherweb’s partner portal. It’s a one-time setup. Just set it and forget it! Follow these 5 easy steps.
See how simple it can be to sell cloud solutions thanks to our PSA integrations
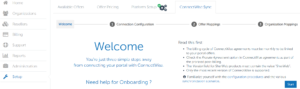
1. Set Up Your ConnectWise Prerequisites
Before you start the onboarding process, you must meet a number of prerequisites. Go to your partner portal and click on the Setup tab. Select the tab marked ConnectWise Sync.
- Create and/or update all your ConnectWise agreements.
- Set the billing cycle for the ConnectWise agreements to Monthly so it will automatically link your portal offers to your agreements. Note the system doesn’t support annual offers.
- If you want to post-bill and prorate your offers, select the Prorate Agreement option in the agreements section.
- Finally, to link a product to an offer, enter Sherweb as your vendor in the Vendor
- Click Start.
2. Create Your Member API
Before you configure your client access in the partner portal, you have to create an API Member in ConnectWise. The API will enable you to get all the subscriptions you have in the partner portal and set them up so they can be integrated in ConnectWise. Note this is a one-time step.
- Go to ConnectWise and click on
- Click on
- Select the API Members tab and Click on New Item.
- Enter your Member ID and Member Name and click Save.
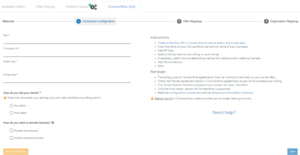
3. Configure Your Connection in Cumulus
As we already mentioned, automating your billing will play a big role in helping you reduce errors. And the best part is, you don’t have to change your billing method to use this system. Whether you’ve been prebilling your customers, billing in arrears or even prorating, you can continue to do so with our ConnectWise integration. Follow the steps below to configure your billing mode. Note that once you save your settings, you cannot edit the billing options.
- Enter your username and password.
- Define your billing options by checking either Pre-billed or Post-billed.
- You also have the option to Prorate new licenses or Prorate removed licenses.
- Click on Test Connection. When this button turns green, click Save.
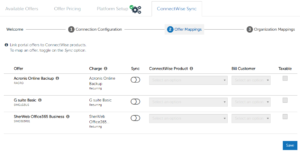
4. Map Your Products
You’ll be able to see all the offers that you’ve provisioned for your customers in our partner portal. Your first step is to specify which offers you want to synchronize in ConnectWise. You don’t have to synchronize all your offers. For example, if you pay Sherweb for some product licenses, but you bill your clients for these products in a bundle with other services, you might not want this information to appear in ConnectWise. Just set up what you need.
- Select the ConnectWise product from the drop-down menu.
- Click Save and the organization mapping will appear.
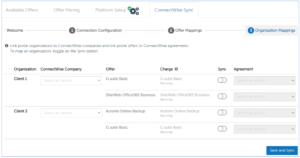
5. Map Your Organizations
Now it’s time to map your organizations to the ConnectWise accounts. Note you don’t have to map all your organizations if you don’t want to. Once you’re done, press Save. You’ll be notified that the synchronization is enabled and working.
- In the Organization mappings tab, select a ConnectWise company to combine with an organization in the partner portal.
- Select the ConnectWise agreement. Toggle the Sync button for each organization you want to synchronize.
- When you are done with the mapping, click Save and Sync.
- All changes will be immediately updated and will appear in the product log in ConnectWise
- If you add a new product to your offering without mapping it in ConnectWise, the system will automatically warn you so you can change it.
- Before you start billing with ConnectWise, we recommend you go into our partner portal and ensure that your setup is correct. If everything looks okay, you can start generating your invoices.
Get Help from Our Experts
If you still need help with onboarding, click on the Support tab. A support ticket will be automatically sent to our Customer Service team. One of our onboarding specialists will contact you to guide you step by step through the onboarding process. You can also find further information linked from the portal itself when doing your setup.
Focus on Your Business
Choosing the right billing system is an important decision for a Managed Service Provider like you. As we said earlier, it will help you save time, be more accurate and run your business more efficiently. Put an end to costly mistakes and focus on what matters most, running your cloud business!
Learn more about ConnectWise in this quick demo.