It’s a beautiful sunny day, and the uninterrupted horizon stretches for miles. Your phone rings. One of your biggest clients begins sharing his hesitation about the plan to integrate Microsoft 365 with his on-premises environment. You notice that the once clear view is now being obstructed by ominous-looking clouds.
Learn how to profit from selling Office 365 with our ebook
Your client is worried because he understands that his company will have to migrate from its legacy applications to the cloud sooner or later. After all, the nature of enterprise business demands that companies embrace new technologies or be left behind. He knows there are numerous benefits to using the cloud, but he’s hesitant about taking the first step.
Why Integrate Microsoft 365?
According to a survey by Gartner, Microsoft 365’s popular suite of applications is used or planned to be used by 78% of enterprise companies. This alone is a good reason to integrate it with your organization’s current environment. Since Microsoft 365 is such a popular platform, most of your clients’ employees are already familiar with how it works. So, unlike newer software, Microsoft 365 is easy to implement because it doesn’t have a steep learning curve.
Here are some great reasons why you should integrate Microsoft 365 with your client’s on-premises environment:
Remote work
Anyone with an internet connection can work remotely through Microsoft 365’s convenient cloud-based platform. Whether you’re sipping lattes at the local café, dropping your kids off for school, or going out of town for business, you can easily stay in touch with your colleagues and clients through Microsoft 365.
Security
With Microsoft 365, you can be confident that your information is better protected. Often, good cloud providers like Microsoft can guarantee better security than IT departments. Storing your data in a safe, secure, and off-site location is incredibly important nowadays. By eliminating the need to manually back up data and storing your information on the cloud, Microsoft 365 protects you and your clients.
Reduced costs
By using the cloud, your clients will no longer have to expand expensive infrastructure or upgrade outdated legacy applications. Microsoft 365 is a true leader of cloud innovation. As such, it’s more than just a fancy package—it’s a long-term investment.
Multi-platform support
As a cloud platform, Microsoft 365 is web-based and works on different platforms, such as Windows, Apple OS, and various mobile devices. This vastly improves accessibility.
Clearly, taking the steps to integrate Microsoft 365 with an on-premises environment offers a number of benefits. So, how do you alleviate your client’s fears? The best advice is to listen to his concerns. What’s fueling his hesitation?
Basically, in the good old days of migrating from mainframe to client-server environments, clients such as yours often encountered issues and frustrating delays. Whenever these migrations failed, they tended to leave people with bad impressions.
Fortunately, there is a simple way to integrate Microsoft 365. A hybrid approach is a great method for smoothly migrating from one environment to another.
Having trouble convincing your clients of the benefits of moving to the cloud? Check out our blog MSP Sales: 5 Common Cloud Objections and How to Handle Them
Integrate Microsoft 365 with the Hybrid Approach
Instead of an all-or-nothing approach, a hybrid migration involves moving a single application to the cloud. Let’s consider a migration of your client’s e-mail mailboxes.
NOTE: If your client’s current e-mail system is Microsoft Exchange Server 2003 or Microsoft Exchange Server 2007, you can migrate their users’ mailboxes and their content over time. When you do this over time, it’s called a staged migration. However, if you’re using Exchange 2013 or Exchange 2010, you’ll need to consider a cutover migration, or a hybrid e-mail migration.
So, let’s assume the following about your client:
- At least one Exchange 2010, Exchange 2013, and/or Exchange 2016 server is currently running on their premises.
- The client is going to “bite the bullet” and move to Exchange Online over the next few weeks.
- The client does not plan to keep running directory synchronization to manage his users.
NOTE: It’s highly recommended that you create a new domain to house new user mailboxes. Follow these steps to do so:
- Log in to your Microsoft 365 account and go to the Domains
- Select the Add domain
- Enter the name of the domain that houses your client’s current Exchange system.
- Select Next.
- Follow the instructions provided by your DNS host provider. The record you add is usually in the form of a .TXT (text) file.
- To verify the account, you need to select the Done, verify now If this is successful, a Verification page will appear.
- Select Finish to complete the process.
Begin express migration
Now that these preliminary steps have been taken care of, you’re ready to start the process of express migration. First, you’ll need to sign in to Office 365 with your admin account.
- Once you’ve logged in, select Data migration from the Users The Migration page should appear.
- Select Exchange from the Select your data service The Hybrid Configuration Wizard will open.
- Select next. The On-premises Exchange Server Organization page will appear.
- Keep the default values and choose next.
NOTE: The Wizard connects to the latest version of the Exchange server by default.
- Select Use current Windows credentials on the Credentials
- Enter your admin credentials, as well as the Office 365 tenant.
- Choose next (twice) after the credentials have been verified.
- Select next from the Minimal Hybrid Configuration on the Hybrid Features
- Finally, from the Ready for Update page, select update. This will prepare your client’s on-premises mailboxes for the migration.
Run the directory synchronization
- Select Synchronize my users and passwords one time from the User Provisioning
- Download the Azure AD Connect Wizard when prompted. This will allow you to synchronize the on-premises users to Office 365.
- Install Azure by accepting the default options for Express settings.
The system then goes to the Data migration page, where you can view all the users who were synchronized with Office 365.
NOTE: Once this one-time synchronization has been completed, directory synchronization is turned off for users.
Assign Microsoft 365 licenses to users
Assigning licenses ensures that your client’s users have mailboxes on the cloud. This will allow you to migrate data from their on-premises mailboxes.
- Navigate to the Active Users page from the Microsoft 365 Admin Center (you can also select Active users from the Users menu).
- Select Edit from the Product licenses
- Use the toggle button to switch the license to On for the desired user(s).
NOTE: All services associated with the license are turned on for users. Use the toggle button to turn off any services you don’t want to assign.
- Select Save to update the information.
Migrate user mailbox content
Now, you’re finally ready to begin migrating the content of your client’s user mailboxes to Office 365.
- Select the Data migration option from the Users The Migration page appears.
- Select Exchange. The Data migration page appears.
- Select the users whose mailboxes you wish to migrate.
- Select Start migration.
It’s recommended that you migrate several mailboxes as a test to make sure that the migration worked as desired.
Note that you can view the progress of the migration from the Data migration page. You can also view status reports for migrated mailboxes in the Exchange Admin Center.
DNS records
A Domain Name System (DNS) is required for an e-mail system to know where to deliver e-mails. Since the MX record was previously associated with your on-premises Exchange, you need to point your record to the Microsoft 365 location.
- Navigate to the Office 365 Admin Center.
- Select Domains from the Settings
- Select the name of the domain you wish to migrate.
- Locate the page where you can make changes to DNS records.
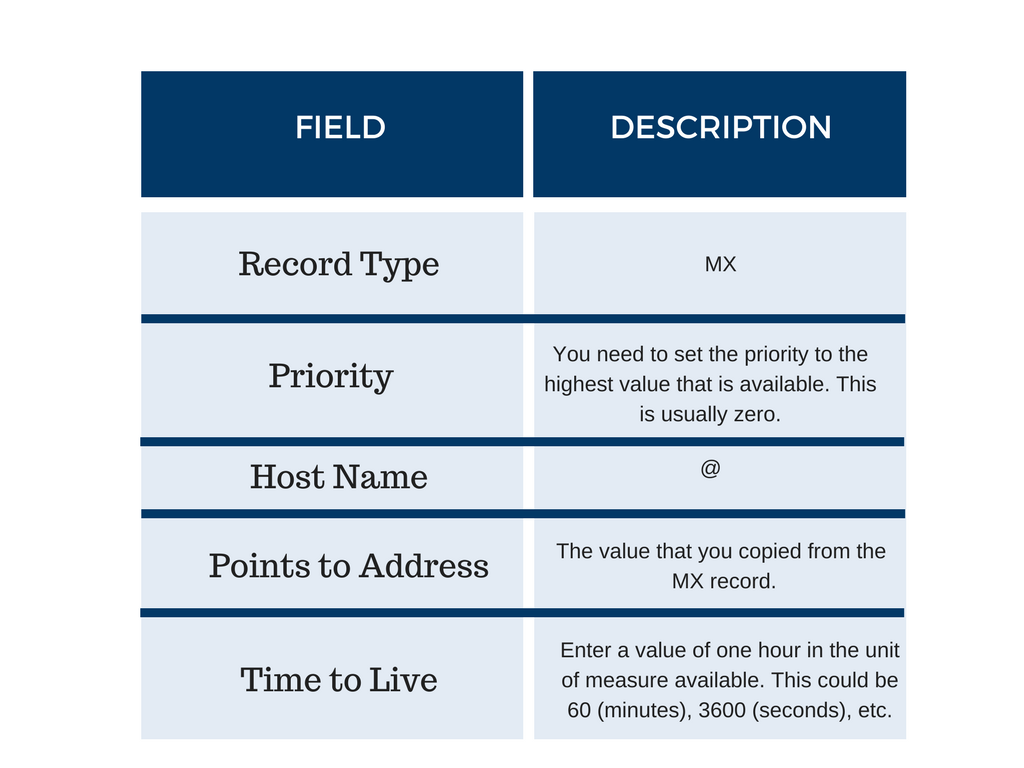
The MX record includes a value called “Points to address”. Its format looks similar to this:
<MX token>.mail.protection.outlook.com, where <MX token> is a value like MSxxxxxxx.
- Add a new MX record.
Fortunately, the process is nowhere near as intimidating as it seems! When you transfer their services to the cloud progressivly like this, it gives your customer and their employees time to adapt at their own pace. By starting with emails in the cloud, rather than something more complex like SharePoint or a Windows server, they can develop an understanding, get trained, and then repeat this process to with other Microsoft 365 applications to the cloud. Within no time, your clients will be enjoying the various benefits that Microsoft 365 has to offer.

** This article was updated on May 13, 2020